Learn to oil paint with Paul Anthony Barker
Check out my blogs with tips on how to paint
Watch my art painting tutorials on YouTube and discover if my tips will help improve you as an artist. Learn oil painting method with my art oil painting demo. Learn how to paint.
My Blog
Still Life Oil Painting Art Advice and Tips

Still Life Oil Painting
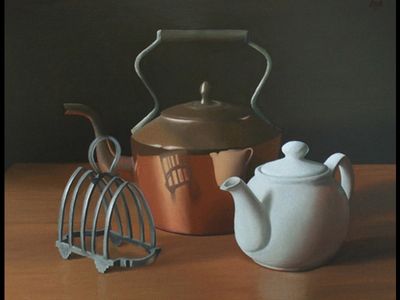
Mastering Still Life: Painting a Copper Kettle
Creating a compelling still life painting requires a blend of technical skill, attention to detail, and a deep appreciation for the subject. Among the many objects that artists choose to depict, a copper kettle stands out for its rich, reflective surface and intricate details. Here’s a step-by-step guide on how to paint a copper kettle, designed to help you enhance your artistic skills and create a masterpiece that captures the essence of this beautiful object.
Step 1: Setting Up Your Composition
Before you start painting, it’s crucial to set up your composition thoughtfully. Place the copper kettle in a well-lit area where light and shadows can play on its surface. Arrange it with complementary objects that enhance its aesthetic appeal, such as fruits, flowers, or a draped fabric. Pay attention to the interplay of light and shadow, as this will add depth and realism to your painting.
Step 2: Sketching the Outline
Begin with a light, preliminary sketch of the copper kettle. Use a pencil to outline the basic shape and proportions. Focus on capturing the kettle’s distinct features, such as the spout, handle, and lid. Keep your lines light and fluid, allowing room for adjustments. This sketch will serve as the foundation for your painting.
Step 3: Blocking in Colours
With your outline in place, start blocking in the main colours of the kettle. Use a medium-sized brush and apply broad strokes to establish the base colour of the copper. Copper has a warm, reddish-brown hue, so mix your paints accordingly. Don’t worry about details at this stage; the goal is to cover the canvas and set the stage for more intricate work.
Step 4: Adding Highlights and Shadows
To create a realistic depiction of the copper kettle, it’s essential to capture the light and shadow accurately. Observe where the light source hits the kettle and use lighter shades to highlight these areas. Conversely, apply darker tones to the areas in shadow. Blending these tones smoothly will give the kettle a three-dimensional appearance. Pay attention to the reflections and the way the light bounces off the copper surface.
Step 5: Detailing the Kettle
Once the basic colours and shading are in place, start adding details to the kettle. Use a fine brush to paint the intricate features, such as the texture of the metal, any dents or scratches, and the reflection of surrounding objects. This step requires patience and precision. Layering different shades of colour can help you achieve a realistic metallic finish.
Step 6: Refining the Surroundings
While the copper kettle is the focal point, the surrounding objects and background should complement and enhance the overall composition. Paint the complementary objects with the same level of care, ensuring they don’t overshadow the kettle. The background can be subtle, with muted tones that make the kettle stand out more prominently.
Step 7: Final Touches
Review your painting from a distance to ensure all elements are balanced and cohesive. Make any necessary adjustments to colours, shadows, and highlights. Adding small reflections or glints of light can enhance the realism of the copper surface. Finally, let your painting dry completely before applying a protective varnish.
Conclusion
Painting a still life featuring a copper kettle is a rewarding endeavour that challenges your observation skills and technical prowess. By following these steps, you can create a captivating piece that showcases the beauty and complexity of a seemingly simple object. Practice regularly, and you’ll see your skills and confidence grow, leading to even more impressive artworks.
By mastering the art of still life painting, you not only create beautiful pieces but also develop a deeper understanding of light, shadow, and colour—skills that are invaluable for any artist. Happy painting!
